Lab 01 · Terraform Foundations
DevOps Studio › Labs › Lab 01 · ⏱ 1–2 hours · Beginner
Build a production-style AWS network and web tier with Terraform — the foundation every later lab builds on. By the end you'll have a multi-AZ VPC, an auto-scaling web tier behind a load balancer, and an encrypted database, all created from code you can destroy in one command.
On this page: Architecture · Prerequisites · Quick Start · Detailed Setup · Project Structure · Configuration · Troubleshooting · Cleanup
What you build
- Multi-AZ VPC — public, private, and database subnets across two availability zones
- Auto Scaling Group + Application Load Balancer — a self-healing web tier
- RDS MySQL (Multi-AZ) — encrypted, with automated backups
- CloudWatch — dashboards and alerts
- IAM roles & security groups — least-privilege access
- Remote state — an S3 bucket with DynamoDB locking
Skills you'll practice: Terraform modules and remote state · VPC and subnet design · auto scaling and load balancing · RDS Multi-AZ · IAM least privilege · CloudWatch monitoring.
Architecture
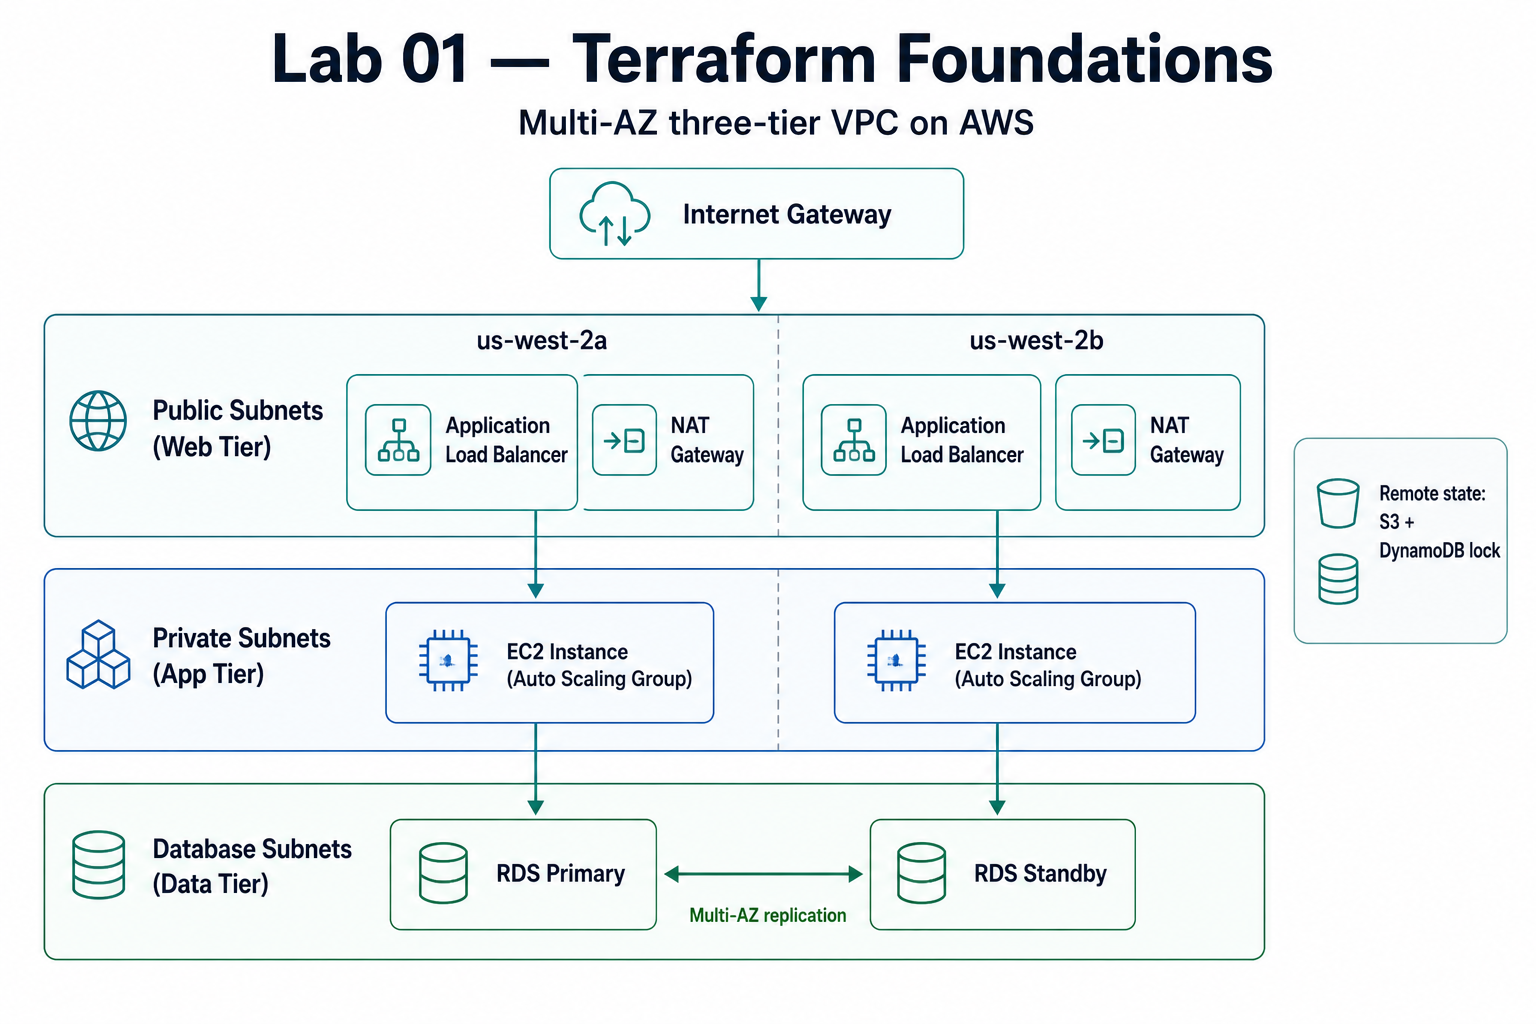
Component Details
| Component | Purpose | High Availability | Security |
|---|---|---|---|
| VPC | Network isolation | Multi-AZ design | Flow logs enabled |
| Public Subnets | Load balancer placement | 2+ AZs | Internet gateway access |
| Private Subnets | Application instances | 2+ AZs | NAT gateway egress only |
| Database Subnets | RDS instances | Multi-AZ with failover | No internet access |
| Auto Scaling Group | Application scaling | Cross-AZ distribution | Security groups |
| RDS MySQL | Data persistence | Multi-AZ with backups | Encryption + secrets |
Prerequisites
Required Tools
| Tool | Version | Purpose |
|---|---|---|
| AWS CLI | 2.0+ | AWS resource management |
| Terraform | 1.9+ | Infrastructure provisioning |
| Git | 2.0+ | Version control |
| curl | Any | Testing and validation |
| jq | 1.6+ | JSON processing (optional) |
AWS Requirements
- AWS Account with billing enabled
- IAM User with programmatic access
- Required Permissions:
- EC2 Full Access
- VPC Full Access
- RDS Full Access
- IAM permissions for roles and policies
- CloudWatch Full Access
- S3 Full Access (for Terraform state)
- DynamoDB Full Access (for state locking)
System Requirements
- Operating System: macOS, Linux, or WSL2
- Memory: 4GB+ available
- Disk Space: 2GB+ free
- Network: Reliable internet connection
Knowledge Prerequisites
- Basic AWS concepts (VPC, EC2, RDS)
- Terraform fundamentals (resources, modules, state)
- Command line comfort
- Basic networking concepts
Quick Start
For experienced users who want to deploy immediately:
# 1. Clone and navigate
git clone <repository-url>
cd devops-studio/labs/01-terraform-foundations

# 2. Set up remote state (creates the S3 bucket, DynamoDB lock table,
#    backend.tf, and a starter terraform.tfvars)
./scripts/setup-backend.sh

# 3. (Optional) tweak the dev settings that `make` uses
$EDITOR environments/dev.tfvars

# 4. Deploy, test, and view outputs
make apply
make test
make output
Deployment time: ~15–25 minutes Cost: roughly $3–5 to deploy, run for an hour, and destroy. Left running it is ~$117/month (see Cost Considerations) — always make destroy when you're done.
Detailed Setup
Step 1: Environment Preparation
Configure AWS CLI
# Configure AWS credentials
aws configure

# Verify access
aws sts get-caller-identity
Verify Tool Versions
# Check Terraform version
terraform version

# Check AWS CLI version
aws --version
Step 2: Repository Setup
# Clone the repository
git clone <repository-url>
cd devops-studio/labs/01-terraform-foundations

# Verify file structure
ls -la
Step 3: Backend Configuration
The backend setup script creates S3 bucket and DynamoDB table for remote state:
# Run the setup script
./scripts/setup-backend.sh

# What this creates:
# - S3 bucket: devops-studio-terraform-state-<timestamp>
# - DynamoDB table: devops-studio-terraform-locks
# - backend.tf with proper configuration
Step 4: Configuration Customization
make plan and make apply read environments/<ENV>.tfvars (default ENV=dev). The backend script also created a terraform.tfvars that Terraform auto-loads on top. To change what gets deployed, edit the environment file:
$EDITOR environments/dev.tfvarsTwo var files, by design:
environments/dev|staging|prod.tfvarshold per-environment settings — this is whatmakeselects viaENV=.terraform.tfvarsholds local overrides Terraform loads automatically. When both set the same value, the-var-file(environment file) wins.
Key Configuration Options (in environments/dev.tfvars)
# Basic settings
project_name = "devops-studio"     # Change if desired
environment = "dev"                # dev, staging, or prod
region = "us-west-2"              # Your preferred region

# Networking
vpc_cidr = "10.0.0.0/16"          # Adjust if conflicts exist
availability_zones = ["us-west-2a", "us-west-2b"]

# Application sizing
instance_type = "t3.micro"         # t3.micro for testing
min_size = 1                       # Minimum instances
max_size = 3                       # Maximum instances
desired_capacity = 2               # Starting instances

# Database configuration
db_instance_class = "db.t3.micro"  # Database size
db_allocated_storage = 20          # Storage in GB

# Cost control
enable_deletion_protection = false # Set true for production
Project Structure
labs/01-terraform-foundations/
├── README.md                    # This file
├── Makefile                     # Automation commands
├── main.tf                      # Main infrastructure
├── variables.tf                 # Input variables
├── outputs.tf                   # Output values
├── backend.tf                   # Generated by setup script
├── terraform.tfvars.example     # Example configuration
├── terraform.tfvars             # Your configuration (gitignored)
├── modules/
│   ├── vpc/                     # VPC module
│   │   ├── main.tf             # VPC resources
│   │   ├── variables.tf        # VPC variables
│   │   └── outputs.tf          # VPC outputs
│   ├── web-app/                # Web application module
│   │   ├── main.tf             # App resources
│   │   ├── variables.tf        # App variables
│   │   ├── outputs.tf          # App outputs
│   │   └── user-data.sh        # Instance initialization
│   └── database/               # Database module
│       ├── main.tf             # RDS resources
│       ├── variables.tf        # DB variables
│       └── outputs.tf          # DB outputs
├── environments/               # Environment-specific configs
│   ├── dev.tfvars             # Development settings
│   ├── staging.tfvars         # Staging settings
│   └── prod.tfvars            # Production settings
└── scripts/                   # Automation scripts
    ├── setup-backend.sh       # Backend initialization
    ├── validate.sh            # Infrastructure testing
    └── cleanup.sh             # Resource cleanup
Module Design Philosophy
Each module is designed for:
- Single Responsibility: VPC handles networking, web-app handles compute
- Reusability: Modules work across dev/staging/prod environments
- Composability: Modules integrate cleanly with outputs/inputs
- Testability: Each module can be validated independently
Configuration
Environment Variables
The lab supports environment-specific configurations:
# Deploy to different environments
make apply ENV=dev        # Uses environments/dev.tfvars
make apply ENV=staging    # Uses environments/staging.tfvars
make apply ENV=prod       # Uses environments/prod.tfvars
Variable Validation
All variables include validation rules:
variable "vpc_cidr" {
  description = "CIDR block for the VPC"
  type        = string
  default     = "10.0.0.0/16"

  validation {
    condition     = can(cidrhost(var.vpc_cidr, 0))
    error_message = "VPC CIDR must be a valid IPv4 CIDR block."
  }
}
Tagging Strategy
Consistent tagging across all resources:
tags = {
  Project     = "DevOps Studio"
  Environment = "Development"
  ManagedBy   = "Terraform"
  Owner       = "Your Name"
  CostCenter  = "Engineering"
}
Deployment
Using Make Commands (Recommended)
# Initialize Terraform
make init

# Create execution plan
make plan

# Apply changes
make apply

# View outputs
make output

# Run validation tests
make test

# Check application logs
make logs

# Connect to instances (requires SSM)
make ssh
Direct Terraform Commands
# Initialize
terraform init

# Plan with specific environment
terraform plan -var-file="environments/dev.tfvars"

# Apply with auto-approval
terraform apply -var-file="environments/dev.tfvars" -auto-approve

# Show outputs
terraform output
Deployment Phases
The deployment creates resources in this order:
Networking (2-3 minutes)
- VPC, subnets, gateways
- Route tables and associations
Security (1-2 minutes)
- Security groups
- IAM roles and policies
Compute (3-5 minutes)
- Launch template
- Auto Scaling Group
- Application Load Balancer
Database (8-12 minutes)
- RDS subnet group
- RDS instance creation
Monitoring (1-2 minutes)
- CloudWatch resources
- Log groups
Total deployment time: 15-25 minutes
Testing & Validation
Automated Validation
The lab includes comprehensive testing:
# Run all validation tests
make test

# Individual test components:
./scripts/validate.sh
Test Coverage
| Test | Description | Success Criteria |
|---|---|---|
| Load Balancer Health | ALB endpoint responds | HTTP 200 response |
| Application Response | App returns expected content | Contains "DevOps Studio" |
| Auto Scaling | ASG has healthy instances | ≥1 InService instance |
| Database Connectivity | RDS is accessible | DB status = "available" |
| Security Groups | Proper rule configuration | Rules match expectations |
| Performance | Response time testing | <2 second response time |
Manual Testing
# Get application URL
ALB_DNS=$(terraform output -raw load_balancer_dns)

# Test main application
curl http://$ALB_DNS/

# Test health endpoint
curl http://$ALB_DNS/health

# Test metrics endpoint
curl http://$ALB_DNS/metrics

# Load testing
curl "http://$ALB_DNS/load?iterations=100000"
Expected Responses
Health Check Response:
{
  "status": "healthy",
  "timestamp": "2024-01-15T10:30:00Z",
  "instance": "i-1234567890abcdef0",
  "uptime": 300.5
}
Main Application: Interactive web interface showing:
- Infrastructure details
- Instance information
- Monitoring links
- Feature demonstrations
Monitoring
CloudWatch Integration
The infrastructure includes comprehensive monitoring:
Metrics Collected
- EC2: CPU utilization, network I/O, disk usage
- ALB: Request count, response time, error rates
- RDS: CPU, memory, disk I/O, connections
- Auto Scaling: Instance counts, scaling activities
Log Groups
/aws/ec2/${project-name}-${environment}: Application logs/aws/rds/instance/${project-name}-${environment}-db/*: Database logs/aws/vpc/flowlogs/${project-name}-${environment}: VPC flow logs
Dashboards
Access the CloudWatch dashboard:
# Get dashboard URL
terraform output dashboard_url
Dashboard includes:
- Application Load Balancer metrics
- Auto Scaling Group status
- Database performance metrics
- Cost and utilization tracking
Alarms and Scaling
Automatic scaling triggers:
- Scale Up: CPU > 70% for 2 consecutive periods
- Scale Down: CPU < 30% for 2 consecutive periods
- Cooldown: 5 minutes between scaling actions
Troubleshooting
Common Issues
Backend Setup Fails
# Error: InvalidUserID.NotFound
# Solution: Check AWS CLI configuration
aws sts get-caller-identity

# Error: BucketAlreadyExists
# Solution: S3 bucket names are globally unique
# Edit PROJECT_NAME in setup-backend.sh
Terraform Plan Shows Constant Changes
# Error: Resources show changes on every run
# Solution: Run refresh to sync state
terraform refresh

# Check for configuration drift
terraform plan -detailed-exitcode
Application Returns 502 Errors
# Error: ALB returns Bad Gateway
# Solution: Check instance health
aws autoscaling describe-auto-scaling-groups \
  --auto-scaling-group-names "devops-studio-dev-asg"

# Check application logs
make logs
Database Connection Issues
# Error: Cannot connect to RDS
# Solution: Verify security groups
aws ec2 describe-security-groups \
  --filters "Name=group-name,Values=*database*"

# Check RDS status
aws rds describe-db-instances \
  --db-instance-identifier "devops-studio-dev-db"
High AWS Costs
# Check running resources
aws ec2 describe-instances --query 'Reservations[*].Instances[?State.Name==`running`]'

# Review RDS instances
aws rds describe-db-instances --query 'DBInstances[?DBInstanceStatus==`available`]'

# Emergency cleanup
make destroy
Getting Help
- Check the logs:
make logs - Validate configuration:
terraform validate - Review AWS CloudFormation events: Check the AWS Console
- Enable Terraform debugging:
export TF_LOG=DEBUG - Check AWS service status: AWS Health Dashboard
Debug Mode
Enable detailed logging:
# Set Terraform debug level
export TF_LOG=DEBUG
export TF_LOG_PATH=./terraform.log

# Run commands with verbose output
terraform plan -var-file="terraform.tfvars"
Cleanup
Quick Cleanup
# Destroy all infrastructure
make destroy

# Confirm destruction
# Type 'y' when prompted
Complete Cleanup (Including Backend)
# Destroy infrastructure and backend resources
./scripts/cleanup.sh

# WARNING: This deletes everything including:
# - All EC2 instances and load balancers
# - VPC and networking components
# - RDS database (with data loss)
# - S3 bucket with Terraform state
# - DynamoDB table for state locking
Selective Cleanup
# Destroy specific resources
terraform destroy -target=module.database
terraform destroy -target=module.web_app
terraform destroy -target=module.vpc
Cost Optimization
Before long-term deployment:
# Scale down for cost savings
terraform apply -var="desired_capacity=0" -var="min_size=0"

# Use spot instances (modify in terraform.tfvars)
# instance_type = "t3.micro"  # On-demand
# spot_price = "0.01"         # Spot instance pricing
Cost Considerations
Estimated Monthly Costs (us-west-2)
| Resource | Configuration | Estimated Cost |
|---|---|---|
| EC2 Instances | 2x t3.micro | $16.00 |
| Application Load Balancer | Standard ALB | $22.00 |
| RDS MySQL | db.t3.micro, Multi-AZ | $25.00 |
| NAT Gateways | 2x Standard | $45.00 |
| Data Transfer | Typical usage | $5.00 |
| CloudWatch | Logs and metrics | $3.00 |
| S3 Storage | Terraform state | $1.00 |
| Total | ~$117/month |
Cost Optimization Tips
Development Environment
# In dev.tfvars
instance_type = "t3.micro"
desired_capacity = 1
min_size = 1
max_size = 2
db_instance_class = "db.t3.micro"
Testing/Learning
# Scale to zero when not in use
terraform apply -var="desired_capacity=0" -var="min_size=0"

# Use single NAT gateway
# Set single_nat_gateway = true in VPC module
Production Considerations
- Use Reserved Instances for predictable workloads
- Consider Savings Plans for flexible compute usage
- Implement automated cost monitoring and alerts
- Regular right-sizing analysis
AWS Free Tier Eligibility
- EC2: 750 hours/month of t2.micro or t3.micro
- RDS: 750 hours/month of db.t2.micro or db.t3.micro
- Load Balancer: Not included in free tier
- NAT Gateway: Not included in free tier
Next Steps
Immediate Next Actions
- Deploy the lab and verify all components work
- Experiment with scaling by changing desired_capacity
- Review CloudWatch metrics and understand the data
- Test disaster scenarios by terminating instances
- Explore the web application features and endpoints
Extending This Lab
- Add HTTPS support with ACM certificates
- Implement blue-green deployments with multiple target groups
- Add container support with ECS or EKS integration
- Enhanced monitoring with custom CloudWatch metrics
- Cost optimization with Spot Instances and Reserved Capacity
Continue Your Learning Journey
Next Recommended Lab
- Lab 02 - Kubernetes Platform - Deploy EKS cluster on this VPC foundation
Related Labs in This Series
- Lab 03: CI/CD Pipelines - Automate deployments to this infrastructure
- Lab 04: Observability Stack - Advanced monitoring with Prometheus/Grafana
- Lab 05: Security Automation - Implement DevSecOps practices
- Lab 06: GitOps Workflows - Deploy applications with ArgoCD
- Lab 07: Serverless Operations - Event-driven architectures
- Lab 08: Platform Engineering - Build internal developer platforms
Other Sequences From Here
Lab 01 also feeds directly into these paths — see the Learning Paths guide for the full detail:
- Platform Engineer: Labs 01 → 02 → 06 → 08
- DevSecOps Engineer: Labs 01 → 03 → 05 → 04
- Cloud Architect: Labs 01 → 07 → 02 → 04
Additional Resources
Documentation
Learning Resources
Tools and Extensions
- AWS CLI - Command line interface
- Terraform - Infrastructure as Code
- terragrunt - Terraform wrapper for DRY configs
- infracost - Cost estimation for Terraform
- tfsec - Security scanning for Terraform
Community
Outcome: a production-style VPC, auto-scaling web tier, and encrypted RDS instance, running from Terraform — the foundation the rest of the labs build on.
Next: Lab 02 · Kubernetes Platform — deploy a managed Kubernetes cluster on this infrastructure.
Navigation: All labs · Lab 02 · Kubernetes Platform ▶